Run your API behind Azure API Management
In order to run your API behind Azure API Management there are a few important steps to take.
You first open the API Management Publisher Portal, this can be done from the Azure Portal by selecting API Management services and your service instance.
If you did not create yet your instance, refer to this article.
You can import definitions in the Swagger, WADL and WSDL format.


While there, under the Permissions menu blade, select your Backend API and all the appropriate permissions for the Developer Portal.
Then you might want to add your Certificate Validation IAuthorizationFilter to your API, where you can check anything you want from the SSL Certificate (sample code here).


You first open the API Management Publisher Portal, this can be done from the Azure Portal by selecting API Management services and your service instance.
If you did not create yet your instance, refer to this article.
Import API
If you want to import your API (rather than creating everything manually), it is essential that you have a correct Swagger definition. I wrote a post about it, so if not sure, have a look here.You can import definitions in the Swagger, WADL and WSDL format.

Assign a Product
Once you imported the API in API Management, you need to assign it to a Product, so users can subscribe to it and obtain their personal Subscription Key, required to access your API.
You can either use the existing Starter or Unlimited, or create a new one.

Setup Authorization Server
Now you can create the Authorization Server that you will use in the Developer Portal of API Management. Once created, you can assign it to your API.Azure Active Directory Developer Portal App Registration
You will need to take care of the Azure Active Directory App Registration as well, also in the above link. In particular make sure that you add the Authorization Code Grant URL generated by the Authorization Server to the ReplyURLs list of the AAD App Registration for the API Management Developer Portal; you also need to add the Application ID and created secret Key of the API Management Developer Portal to the Client Credentials fields as shown here.
While there, under the Permissions menu blade, select your Backend API and all the appropriate permissions for the Developer Portal.
Setup SSL Certificate
If you use Mutual Client Authentication with SSL Certificate, you will need to upload your certificate to API Management, and assign it to your API in the Security section. Once you did that, you can verify in the API Management Policies section that you have an Inboud policy to provide your certificate's Thumbprint to your API.Then you might want to add your Certificate Validation IAuthorizationFilter to your API, where you can check anything you want from the SSL Certificate (sample code here).

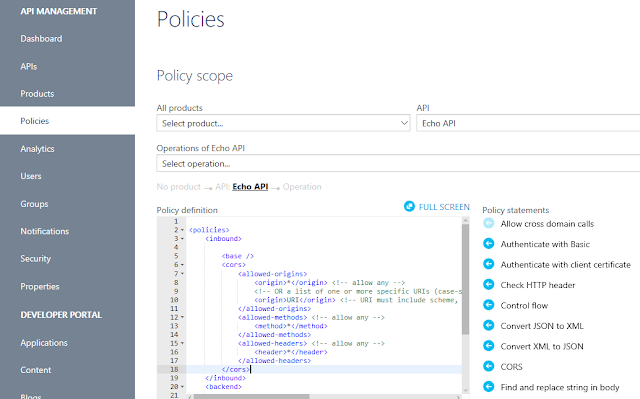
Setup C.O.R.S.
You might want to add another policy in API Management to allow C.O.R.S., depending on your API clients. You can simply select the CORS policy in the list.
Test in Developer Portal
If everything is done properly you should now be able to open the API Management Developer Portal and test your API, providing automatically the correct Subscription Key, and obtaining the OAuth2 Token from the created Authorization Server.


Nice blog! for more updates Azure Online Course Bangalore
ReplyDeleteNice and good article. It is very useful for me to learn and understand easily. Thanks for sharing your valuable information and time. Please keep updating mulesoft Online Training
ReplyDelete