RabbitMQ on Kubernetes Container Cluster in Azure
Introduction
This post is quite technical (and long, and detailed), so
sit down, enjoy your coffee, and let’s get started!

Containers
are becoming the way forward in the DevOps
and IT worlds, as they greatly simplify
deployments of applications and IT
infrastructure.
RabbitMQ
is “the most widely deployed open source message broker”, and easy to use
within a Docker Container Image.
To follow this tutorial you can use the built in Azure Cloud Shell, or download and install the Azure CLI, and use PowerShell locally. Make sure you have installed Azure PowerShell.
Here I am using PowerShell.
Resource Group
First you have to login to Azure through PowerShell:
az login
You will receive a message such as:
To sign in, use a web browser to open the page https://aka.ms/devicelogin and enter the code CF5G5AJQZ to authenticate.
Follow the above instructions, and PowerShell will be logged onto Azure,
returning the available Azure Subscriptions details.
Copy the ID of
the Subscription you want to use,
and use it in the next command:
az account set --subscription "[My-Azure-Subscription-ID]"
Now you can create the Resource
Group used for the Kubernetes
Cluster:
az group create --name "[My-ResourceGroup]" --location "westeurope"
Service Principal
Now create a Service
Principal to be used for the Kubernetes Cluster:
az ad sp create-for-rbac --role="Contributor" --scopes="/subscriptions/"[My-Azure-Subscription-ID]/resourceGroups/[My-ResourceGroup]"
Copy the appId, password and tenantId values returned, and test the login for your newly created
Service Principal:
az login --service-principal -u "[My-App-ID]" -p "[My-Password]" --tenant "[My-Tenant-ID]"
You should receive the details of the current Subscription, with user type “servicePrincipal”,
so now you can test its permissions by executing the following command:
az vm list-sizes --location westus
If this command returns a long list of VM Sizes, you’re good to go. If not, talk to your Azure Subscription Owner.
Now login again as your main user as you did before, and
again set your Subscription:
az login
az account set --subscription "[My-Azure-Subscription-ID]"
You need to create a SSH
key, follow this tutorial:
Kubernetes Cluster
You can create a Kubernetes Cluster locally using MiniKube.
First download the ARM
Parameters file from:
Make sure you fill this file with your details, something
like:
{
  "$schema": "http://schema.management.azure.com/schemas/2015-01-01/deploymentParameters.json#",
  "contentVersion": "1.0.0.0",
  "parameters": {
    "dnsNamePrefix": {
      "value": "[My-Unique-Kubernetes-Cluster-DNS]"
    },
                "agentCount": {
                  "value": 1
                },
                "masterCount": {
                  "value": 1
                },
    "adminUsername": {
      "value": "[My-ServicePrincipal-Username]"
    },
    "sshRSAPublicKey": {
      "value": "[ssh-rsa My-RSA-PublicKey]"
    },
    "servicePrincipalClientId": {
      "value": "[My-ServicePrincipal-ID]"
    },
    "servicePrincipalClientSecret": {
      "value": "[My-ServicePrincipal-Password]"
    },
    "orchestratorType":{
      "value": "Kubernetes"
    }
  }
}
Now you can run the following command to create the Kubernetes Cluster:
az group deployment create -g "[My-ResourceGroup]" --template-uri "https://raw.githubusercontent.com/Azure/azure-quickstart-templates/master/101-acs-kubernetes/azuredeploy.json" --parameters "[My-Local-Path]\azuredeploy.parameters.json"
After about 15 minutes you should get a response, which
hopefully will display ”Finished”
and “Succeeded”, along with all the
configuration of your newly created Kubernetes
Cluster.
So if you now open the Azure
Portal, and browse to your Resource
Group, you should see something like this:

This is your newly created Kubernetes Cluster on Azure!
However, you are not done just yet.
You still need to install RabbitMQ on your Cluster,
as well as create another Azure Load
Balancer and two more Public IPs
to expose RabbitMQ publicly.
RabbitMQ
First let’s make sure that you are connected to the right Cluster (in case you have created more than
one, this command is essential).
az acs kubernetes get-credentials --resource-group="[My-ResourceGroup]" --name="[My-ContainerServiceName]"
So if you now run the following command to get info about
your Cluster:
kubectl cluster-info
You should see the following output:
Kubernetes master is running at https://[My-Unique-Kubernetes-Cluster-DNS].westeurope.cloudapp.azure.com
Heapster is running at https://[My-Unique-Kubernetes-Cluster-DNS].westeurope.cloudapp.azure.com/api/v1/namespaces/kube-system/services/heapster/proxy
KubeDNS is running at https://[My-Unique-Kubernetes-Cluster-DNS].westeurope.cloudapp.azure.com/api/v1/namespaces/kube-system/services/kube-dns/proxy
kubernetes-dashboard is running at https://[My-Unique-Kubernetes-Cluster-DNS].westeurope.cloudapp.azure.com/api/v1/namespaces/kube-system/services/kubernetes-dashboard/proxy
tiller-deploy is running at https://[My-Unique-Kubernetes-Cluster-DNS].westeurope.cloudapp.azure.com/api/v1/namespaces/kube-system/services/tiller-deploy/proxy
Based on this tutorial,
now create a YAML configuration file
(call it: rabbitmq.yaml), for your RabbitMQ.
You can use the following:
apiVersion: v1
kind: Service
metadata:
  # Expose the management HTTP port on each node
  name: rabbitmq-management
  labels:
    app: rabbitmq
spec:
  ports:
  - port: 15672
    name: http
  selector:
    app: rabbitmq
  sessionAffinity: ClientIP
  type: LoadBalancer
---
apiVersion: v1
kind: Service
metadata:
  # The required headless service for StatefulSets
  name: rabbitmq
  labels:
    app: rabbitmq
spec:
  ports:
  - port: 5672
    name: amqp
  - port: 4369
    name: epmd
  - port: 25672
    name: rabbitmq-dist
  clusterIP: None
  selector:
    app: rabbitmq
---
apiVersion: v1
kind: Service
metadata:
  # The required headless service for StatefulSets
  name: rabbitmq-cluster
  labels:
    app: rabbitmq
spec:
  ports:
  - port: 5672
    name: amqp
  - port: 4369
    name: epmd
  - port: 25672
    name: rabbitmq-dist
  type: LoadBalancer
  selector:
    app: rabbitmq
---
apiVersion: apps/v1beta1
kind: StatefulSet
metadata:
  name: rabbitmq
spec:
  serviceName: "rabbitmq"
  replicas: 4
  template:
    metadata:
      labels:
        app: rabbitmq
    spec:
      terminationGracePeriodSeconds: 10
      containers:
      - name: rabbitmq
        image: rabbitmq:3.6.6-management-alpine
        lifecycle:
          postStart:
            exec:
              command:
              - /bin/sh
              - -c
              - >
                if [ -z "$(grep rabbitmq /etc/resolv.conf)" ]; then
                  sed "s/^search \([^ ]\+\)/search rabbitmq.\1 \1/" /etc/resolv.conf > /etc/resolv.conf.new;
                  cat /etc/resolv.conf.new > /etc/resolv.conf;
                  rm /etc/resolv.conf.new;
                fi;
                until rabbitmqctl node_health_check; do sleep 1; done;
                if [[ "$HOSTNAME" != "rabbitmq-0" && -z "$(rabbitmqctl cluster_status | grep rabbitmq-0)" ]]; then
                  rabbitmqctl stop_app;
                  rabbitmqctl join_cluster rabbit@rabbitmq-0;
                  rabbitmqctl start_app;
                fi;
                rabbitmqctl set_policy ha-all "." '{"ha-mode":"exactly","ha-params":3,"ha-sync-mode":"automatic"}'
        env:
        - name: RABBITMQ_ERLANG_COOKIE
          valueFrom:
            secretKeyRef:
              name: rabbitmq-config
              key: erlang-cookie
        ports:
        - containerPort: 5672
          name: amqp
        - containerPort: 25672
          name: rabbitmq-dist
        volumeMounts:
        - name: rabbitmq
          mountPath: /var/lib/rabbitmq
  volumeClaimTemplates:
  - metadata:
      name: rabbitmq
      annotations:
        volume.alpha.kubernetes.io/storage-class: default
    spec:
      accessModes: [ "ReadWriteOnce" ]
      resources:
        requests:
          storage: 1Gi # make this bigger in production
So now that you have created the rabbitmq.yaml locally, let’s create a generic secret for the Erlang Cookie by running the command (use
a better secret though..):
kubectl create secret generic rabbitmq-config --from-literal=erlang-cookie=c-is-for-cookie-thats-good-enough-for-me
And finally create the RabbitMQ
Kubernetes Services and Pods:
kubectl create -f "[My-Local-Path]\rabbitmq.yaml"
Verify all Parts
Run the Kubernetes
Dashboard locally, by running the following command (port is optional, the default uses 8001):
kubectl proxy --port=8080
And if you open your browser to the URL http://127.0.0.1:8080/ui you should see the
Kubernetes Dashboard, like this:

Here you will see all details about the Kubernetes Cluster, Pods, Services, etc.
And if you click on the rabbitmq-management IP Hyperlink
displayed (use guest as both username and password), you will access the RabbitMQ
Management dashboard, showing four
nodes:
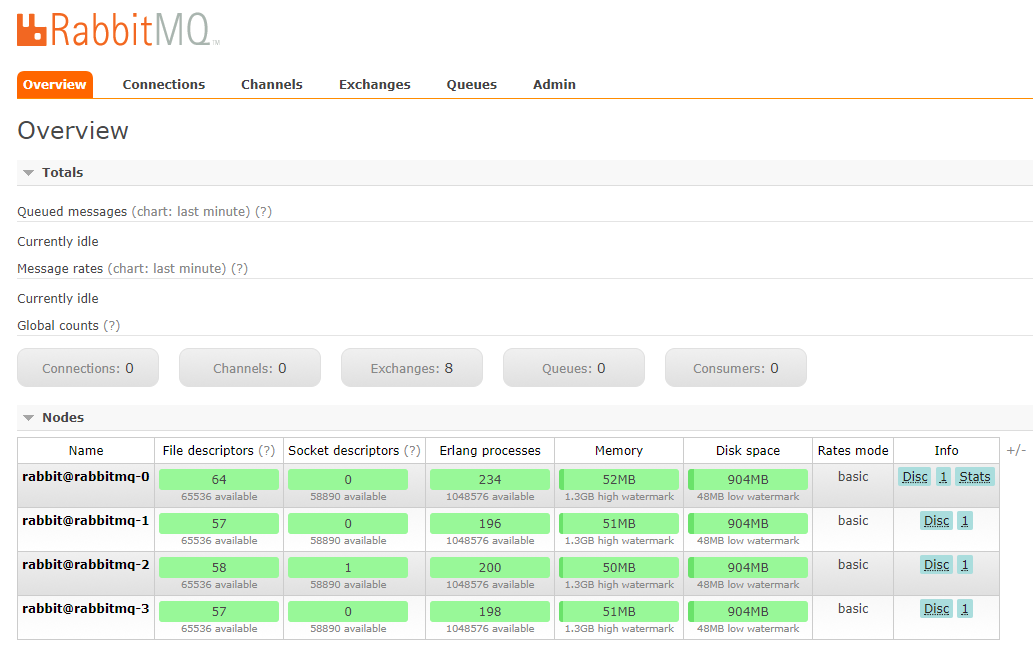
You can see in the Pods
section of the Kubernetes Dashboard
the corresponding four Pods:

And
to complete the picture, if you look at your Azure
Resource Group again:

You will notice three new resources added: a Load Balancer for RabbitMQ, and two new Public IP addresses, to expose RabbitMQ and its Management Dashboard.
This is it for this long post, enjoy your Containers!


I have read this post. collection of post is a nice one Azure Online Training Bangalore
ReplyDeletewe working our way through the alphabet using super heroes.
ReplyDeleteMicrosoft Windows Azure Training | Online Course | Certification in chennai | Microsoft Windows Azure Training | Online Course | Certification in bangalore | Microsoft Windows Azure Training | Online Course | Certification in hyderabad | Microsoft Windows Azure Training | Online Course | Certification in pune
Really it is very useful for us..... the information that you have shared is really useful for everyone.Excellent information. Very useful to everyone and thanks for sharing this.
ReplyDeletePHP Training in Chennai | Certification | Online Training Course | Machine Learning Training in Chennai | Certification | Online Training Course | iOT Training in Chennai | Certification | Online Training Course | Blockchain Training in Chennai | Certification | Online Training Course | Open Stack Training in Chennai |
Certification | Online Training Course